To many folks today, Film is practically dead. A quaint memory from the last century. Everybody it seems has done digital. When did you last see an advert for Film or film cameras ?
Yet film is still being used, albeit in much smaller quantities. How long then before Film disappears ?
Digital has certain advantages that have made it a runaway success, not least the speed in seeing your results. A great boon for press and wedding photographers, but not necessarily for all forms of photography. While you're looking at that tiny screen, which may not tell you everything about the picture, you could be missing your next shot. Anyway, a competent photographer surely knows if he or she has got the desired image, without having to peep.
That Film Look
Many serious photographers still prefer the look of film, in fact some digital photographers have gone back to it. One reason could be the enormous cost savings on used professional equipment. Another little-publicised reason is the fact that film technology has made big strides in recent years. Some new film emulsions are virtually grainless, well surpassing the resolution of digital photographs. Then there's that elusive 'film look' that is so hard to put into words.
History
All through the years, we have been persuaded to part with our cash to buy the latest photographic gear, regardless of whether we actually need it to take better photos. Look at the stunning quality images they turned out in Victorian times.... In the 1950s and early 60s many folks were working with medium format Rolleiflexes, then everyone was persuaded to buy 35mm SLRs, and the lower cost of film won the day. But did the photos get that much better ? Quality-wise they took a nose-dive. Because 35 mm was that much smaller, and therefore grainier. Fast-forwarding to today, the resolution of 35mm film now out-performs what we used to admire in medium format. Even a humble Zenith costing less than £10 can turn in stunning images.
But once again, the hype tells us to move on... not live in the past but embrace all things digital. Film is an out-dated medium. So, will Film disappear ? And how long has it got ?
The Movies
Sofar we've looked at 35mm stills. But remember, 35mm is really cine film. Apart from minor differences it's the same stuff they use for making Hollywood blockbusters. Kodak and Fuji have always sold far more film to the cinema film industry than to still photographers. Therefore, as long as features and TV commercials continue to use 35mm film, it will be available for still photography. And don't forget 16mm film, still very popular for TV dramas and documentaries. Steven Spielberg and many younger directors, are totally committed to film. Others are gradually moving over to digital filming as the quality improves. Digital Intermediates are used now on nearly all features, enabling special effects to be added more cheaply, prior to scanning back onto film. Unfortunately, a DI if done at too low a resolution makes the quality of the film suffer. And digital projection at 2K looks like another step in the wrong direction. It looks so much better projected on film. However, Film continues to be the top origination medium for movies.
Apart from ascetic reasons, why do film-makers go for old-fashioned chemical film ? A powerful reason is: it's future-proof. So many digital and video formats have come and gone. (Looks as if Super-8 will outlive old VHS that nearly killed it ! ) More video formats in the future will no doubt bite the dust, as we're persuaded to buy more and more to keep up. How many times in the next 50 years will video films have to be transferred to new formats ? But the basically simple technology of film remains almost unchanged, because it doesn't have to change. It's proved itself for more than a century, getting on for two I suppose, for still images. Those stunning Victorian plates, remember ?
Where's the Guarantee ?
Digital photography has a bit of a question-mark over it simply because it's so young. An archivist told me recently that he photographs important documents on old-fashioned slide film. Digital is still too risky, he says, for long-term storage. We know that the colours of Kodachrome, properly stored, last maybe a century or more. Kodak have stopped making Kodachrome unfortunately. But they reckon that their latest Ektachrome films will not fade for at least 80 years.
Film-makers, having spent so much effort on a production, are similarly anxious about their film's long term survival. With black and white there is little problem because we now know that the film will last for perhaps 5 centuries or more as long as it has been archivally processed and stored. Digital sound-tracks can also be safely preserved in this way, optically on film. But is there a way that colour films can be protected down the centuries ? Yes... It's expensive, but worth doing on the classic movies. Using high resolution black and white film, you make 3 'separation positives' from the original colour negative. Separate magenta, cyan and yellow filters are employed. From these 3 black and white archival masters, you can print off a new full-colour intermediate... anytime in the next 500 years. Simple ! Does digital offer this lengthy guarantee ?
Survival
Back to basics though. Will Film get through the economic slump ? However good a product.... if people fail to buy it, through lack of advertising by Kodak's financial people, or for any other reason, it's unlikely to survive. In normal times, how long such a film product holds on does vary alot. With Super-8 Kodachrome they pulled the plug as soon as sales dropped to 100,000 films a year. Fuji already had a much smaller share of the movie market with their excellent Single-8 films. They followed suit. However, in Japan there was uproar from artists and film-makers, and true to Japanese honour, Fuji was persuaded to carry on. Strangely, when things get really bad, smaller firms step in. 9.5mm movie film died officially many years ago, yet a handful of enthusiasts carry on buying films, now with the modern Fuji emulsions. You can even buy a black and white roll of 127 film for your Kodak Brownie !
Over the years we've seen some of the more exotic film emulsions disappear. Remember Scotch 1000, the slide film with the golf-ball grains ? At the other end of the scale, Ektachrome Duplicating Film (daylight variety) that gave amazingly subtle results where its 8asa speed allowed. I hope Kodak and the other manufacturers keep having a good variety of film types, ignoring the pressure to axe the slower sellers. Choice is so important in creating the image you are after. And it's surely better to see the light doing its work on the film, without having to resort to computer effects later. So if you like the effect of a particular kind of film, use it as much as possible, and tell other photographers how good it is. Use it or lose it.... And remember, in real terms the cost of film has never been lower. In the 1960s, a roll of 35mm Kodachrome cost as much as filling your car up.
What of the general situation then.... Is the game up ? I have a feeling ( I don't think it's wishful thinking) that Film is just that bit too special to disappear from our world. Commonsense surely dictates that both Film and Digital images have their rightful place in the 21st century.

Friday, December 5, 2008
How to Dry Your Movie Film
Many people who process their own cine film find the actual drying the trickiest part. How to avoid marking the film.... and get nice, clean professional-looking results ?
Get a plastic-covered board about 2 metres long and screw on eyelets at regular intervals. Make a number of S-hooks out of wire, to support the film by its perforations. It's a good idea to use a file to taper one end to a point to make it easy and quick to hook on the film.
The board is hung or supported near the ceiling of a relatively dust-free room. Maybe use hooks to do this. A large plastic sheet about 4.5 metres long is taped to the back edge of the board. The other end is attached to a piece of doweling. Fit two suitably sized hooks to the front edge of the board, to hang the dowel.
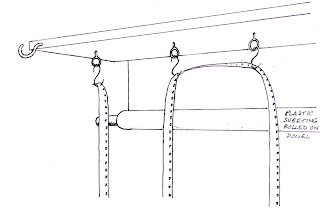
You will also need a length of card about the same width as the board. Also a good quality sponge: simply cut a slit into it with scissors. Oh, and some clothes pegs.
After processing and thoroughly washing your film, give it a final rinse in distilled water, to remove any chalky deposits if you live in a hard water area. Then add a few drops of wetting agent and give the processing spiral a final swish. Rinse the sponge and squeeze almost dry. Take the spiral out of the developing tank, and attach the end of the film to the first S-hook. As the spiral is turned the film should unwind easily. This is always an exciting moment as you see the frames of film for the first time, but try and resist too long a look as there are specks of dust homing in ! Work quite fast but with great care. Have a clean chair handy to place the spiral on (unless you have three hands). Now with about 2 metres of film unwound, turn your attention to the sponging. Hold the film near the top by its edges, attach the sponge by its slit, then pull gently along it. Unwind another 2 metres of film and place the spiral on top of the board, while you sponge that length. Then very carefully attach the film by a perforation onto the next S-hook. Then onto another nearby hook so as to keep the loops apart and hanging nicely.
Carry on like this until the whole film is unwound and hanging in long loops nearly to the floor. Depending on the length of film you may have to double back with more hooks along the board. Always ensure that the sponge is wrung out and scrupulously clean, then it will never scratch the soft film.
Finally, unroll the plastic sheeting from behind the loops of film, and near the floor place the length of card onto it. This weighs down the sheet and ensures it doesn't touch the film. Unroll the rest of the sheet and hang up the dowel. Peg the sides of the sheet together but allow considerable gaps for air to pass through. You now have a virtually dust-free container. Leave the film in it for maybe 12 hours, as you want it bone dry before it's wound onto a spool to project. Hopefully, you'll find your film in pristine condition, without any dirt or marks. If you still see the odd chalky mark, which doesn't harm the film incidentally, it can be removed with a soft cloth.
The key to decent results is absolute cleanliness. If you can't find a room without dust, try commandeering the bathroom, in fact the bath might be a good place to hang the film and easy to cover.
And, for those who haven't yet tried home-developing, it's a fantastic feeling to project the film knowing you've done it ALL yourself. !
Friday, October 24, 2008
Bolex Survives Afghan Waterfall
I will never forget an incident that happened to me in Afghanistan, way back in 1969 when the King was still in power....
In the central hills there is a series of stunning blue lakes, and the minerals in the water have created a dam, called Band-i-Amir. The water cascades over. This must be one of the relatively unknown wonders of the natural world.
At the top of one of the waterfalls I was about to set up my trusty Bolex H-16RX, with a Som Berthiot zoom lens fitted with anamorphic, in an attempt to take in the breathtaking view. It was slippery...
Before I could get the camera onto the tripod, I stumbled, and the camera somehow escaped my grasp... and joined the waterfall. I couldn't see it, and I scrambled down the 30 feet or so, then jumped into the pool below. My frantic efforts darting around to locate the object made two local chaps laugh uncontrollably !
I wasn't so amused. When I fished it out, it was obvious that the water had got everywhere, into the mechanism and between the lens elements. The RX Fader, bashing against the rocks, was twisted into a strange shape, though the body and lenses didn't look bad. I returned to the Land Rover and shut myself into the dark, hot trailer to try and save the film. Luckily, not too much water was between the leaves of film, and it dried quickly in the Afghan atmosphere. But the sodden camera was going to be a job for Messrs. Bolex.
After my return to UK, I sent the camera to them and it arrived back a few weeks later. Incredibly, those perfectionists had made everything look like new. And Kodak as usual did a great job with the film, and all my movie material was fine. (No, the camera wasn't running as it went down, unfortunately !) That Bolex certainly was a sturdy beast. And it joined me on many more outings... including back to Afghanistan a year later !
Some of the footage I shot at Band-i-Amir went into my 16mm documentary The Giant Buddhas of Bamiyan.
I see there are some more pics of this place which maybe show the natural dam better, at www.greatgametravel.com

I took these Kodachrome slides with a Kodak Retinette that I was given as a boy. They say this lake could be 1000 feet deep. The water is amazingly clear.

This landscape reminds me of Planet of the Apes ! Talking of feature films, do you remember The Horsemen with Omar Sharif and Jack Palance ? Some of it was filmed around here.

Very few people live in the area, at least when I was there in 69 / 70.

This photo shows one of the Land Rovers driven by life-long friend Martin, somewhere in Afghanistan, I can't remember exactly where. It was taken by my brother Rex... with a 35mm Contarex, that huge SLR with interchangeable backs, if I remember rightly... I wonder what was to happen to this proud and independent Afghan family in less peaceful times....
Tuesday, October 14, 2008
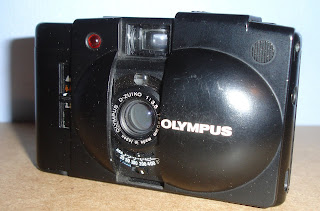
To India with an Olympus XA2
On a recent trip to South India I thought I'd travel really light, so took the little Olympus XA2 35mm camera.
I found it great for all sorts of subjects. Here's just a few...
It was nice not having to worry about which lens to use, and the exposure system performed very well. I used mainly Ilford FP4, and when I'd run out of film (India is that sort of place !) I bought some Indian Kodak colour neg. film, and continued with that.
I like the XA2 as it's so quiet and unobtrusive. However, as streets in India can be rather noisy (understatement of the year) I often wasn't sure if the shutter had fired !
The Zuiko 35mm lens is really good performer, and I found I could enlarge the pictures alot.
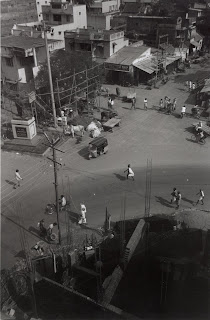


Sunday, October 5, 2008
Telecine Without Tears - Film to video the cardboard way
TELECINE WITHOUT TEARS
Film to Video the Cardboard Way
Putting cine movie-film onto video/DVD can cost quite a lot if it's done professionally. And unless you use a reputable lab, results can vary, together with a risk of losing or damaging your film.
It's relatively easy to do your own telecine transfers. And the quality can be impressive. Here's how.
What you need
A camcorder, a movie projector that has constantly variable speeds, and a piece of good quality cardboard ! A lot cheaper than a telecine translucent screen and probably better, without grain or hot-spot problems.
Getting the Speed right
You can use a projector with non-variable speeds, but the chances are you'll notice fluctuations of the light in the video image. Still there's nothing to lose in giving it a try, and your projector just might have more-or-less the right speed regardless of what it says ! However, it's best to be able to vary the projection speed if you want to be sure of constant image density. The speed should be very near 16.66 frames per second, or 25 frames per second. This is if you have 50 cycle mains electricity. In the USA it's 60 cycles, so the speed needs to be 15, 20 or 24 f.p.s.
So first you have to decide what speed the film was taken at. Silent films are normally shot at 16 or 18 f.p.s. Sound films could have been shot at any speed: 16, 18, 24 or 25. If you are unsure, just project the film and see if the folks move around normally. In practice, it doesn't really look wrong if the film was shot at say 18 f.p.s. and you project at 16.66 f.p.s. And 24 looks exactly the same as 25. How it sounds is a different matter, but more of that later. Choose your transfer speed nearest to the original filming speed.
Improving the Image
It obviously makes sense to start off with the best quality image. Rather than projecting a big image on a screen, find a piece of good white card a few inches across, certainly no more than a foot, and focus the projector on that. If your film material is rather contrasty, try using a cream-coloured card. Another way to reduce contrast is to introduce into the room a bit of ambient light.
The projector should give a very evenly-lit image. Normally, your eyes adjust to a film image that is perhaps bright in the middle but tailing off towards the edges. But the camera's eye sees what it sees, and consequently the image will look odd. The earlier projectors with conventional tungsten lighting and condenser lenses, often give more even lighting than halogen projectors without condensers. If your projector gives uneven lighting, try putting a grey water-colour wash onto the centre of the card, softening off towards the edges. Or, in front of the camcorder or projector use a piece of optical glass or filter that has been darkened in the centre.
The projector zoom-lens should be set at a long focal length. Alternatively, use a fixed focal length lens. If you are projecting 8mm, try using a 16mm projector lens of say 35mm or even 50mm focal length. Now.... as you are showing a small image you have light to spare.... Make a black card or paper “washer” that fits neatly into the end of the projector lens barrel. It should be right up against the front lens element. Don't make the hole in the washer too small, but enough to effectively close down your lens by a couple of f-stops. This will give a quantum leap in definition ! Why ? Because it's like a camera-lens.... the sharpness improves when the outer parts of the lens are not in use. All lenses work better when stopped down. On a normal size of screen it would give a rather dim image, of course, but it's bright enough on our cardboard screen.
The Transfer
So now, hopefully, we have a nice sharp evenly-lit image that shows the cine film at its best. Before the transfer, it's a good idea to thoroughly clean the film with special film-cleaner if it needs it, or at least remove dust with a soft cloth.
Firmly set up the camcorder somewhere near the centre-line of the projector, perhaps behind or just above it. If above, beware of ripples of heat from the lamp-house ! The lens on the camera will be at a long focal length setting, so that the projected image fills the viewfinder. Manually focus on some news-print held against the card, and keep this focus setting for the actual transfer. Key-stoning of the image shouldn't be a problem as you are situated well back from the small screen. When you are satisfied that framing and focus are perfect, turn off the lights and begin the transfer. Ideally the camcorder's exposure should be set manually to one aperture for the whole film.
Examine your results on a fairly large video screen. If you still see density fluctuations, fine-tune the projector speed and try again. With care you'll end up with a good, sharp telecine, that looks professional.
Sound
If the film carries a sound track, you can connect the sound projector to the camcorder and record in sync. How you do this in order to get a good track on video is outside the scope of this blog. However, coming back to the projector running speeds.....Whereas our eyes are easily fooled by a slightly wrong speed, our ears usually are not ! A sound track recorded at 18 f.p.s. for example, will most likely sound wrong at 16.66 f.p.s. So it may be best to transfer the sound independently to the computer, then lay the track onto the video, making sync adjustments as necessary. Maybe others would like to comment....
Subscribe to:
Posts (Atom)
