This is my blog about my interests in photography and film-making, also my travels as well as other items that I feel may be of interest. I also run the Photography equipment website, Filmcam....................................... IF YOU WANT TO ENLARGE ANY IMAGE BELOW SIMPLY CLICK ON IT !

Tuesday, December 7, 2010

Stopping the Fog


If you use movie film on spools have you ever been unable to find a shady spot for loading ? It happened to me a couple of summers ago, with just my own shadow for shade... Result: a big chunk of edge-fogging. Luckily most of the picture area was saved, but only just... if it had been Super-16 the outcome would have been far worse. Whoever first called them 'daylight' spools had his tongue firmly in his cheek.

Then, how about trying to load a film-sandwich as I showed you last time ? Or any slightly complicated procedure for that matter that needs some time and a good light to work by.

This anti-fog box takes only minutes to make. It's simply a 100ft film container that has a small piece cut out, and then coated with black velvet. Place the spool inside and pass some film out of the slot. The box can be stored in a black plastic bag until you are ready to load. Pull out a foot or so of film and load the camera without attaching the film-spool. Pull out a bit more film and satisfy yourself that everything with the camera is otherwise OK, the take-up not slipping and so on. Now, in as much shade as possible, perhaps under a jacket, open the container and place the film-spool in position on the feed spindle. This simple act only takes a matter of seconds and so it's relatively easy to shield the film. A final burst of the motor then bring down the door. The idea is that most of the task can be carried out in broad daylight, taking one's time.

Another use that I have found for the anti-fog box is in the darkroom. After a few beers it can sometimes be rather fiddly attaching a 16mm film to a processing spiral. But not with the lights on. When the curls of film are starting to follow the grooves, turn off the light and open the box. Now place the spool on a vertical spindle, hold the film at the magic 70 degrees angle, and the film loads in no time.

Did you spot the mistake in the 'Kodak' printer I sketched last time ? Yes, the take-up should be clockwise not anti-clockwise ! Incidentally, the anti-fog box wouldn't be much use loading this Kodak because the film spool must be fitted first in the inner chamber, but that effectively protects the film from fogging anyway.

Tuesday, November 16, 2010

Printing Special Effects In-Camera


I think maybe I should explain more about the step-printing gadget I showed you last time.

I now feel a little guilty sawing up that elderly Kodak, but at the time it was about cheapness. Maybe guilty's the wrong word, as this gadget has proved itself alot over the last few years. You can use virtually any 16mm spool-loading camera, as long as it can be persuaded to run two strips of film through the gate. With the Kodak, I first tried attaching a spool of film on the spindle I'd fixed above the gate. It worked, but I felt there was rather alot of drag, so I later arranged for the film to run up from a bin, into the box and down through the gate. It's touched at the edges only by concave rollers and black velvet. After leaving the gate it plunges into a second bin. By the way, if printing from single-perf film it has to run tail-end first, to enable the two emulsion layers to be in contact.

A step-printer is a good tool for making various effects. Because the camera film and the film to be printed share the same claw, the results should be rock-steady. In the other example right we can see how an unmodified camera, in this case a Bolex H16RX, can be used for bi-packing. Say you need moving foreground objects in your studio-shot, perhaps a train passing, or a bat flying by. First film a silouhette of the train or bat against some bright sky. Don't ask me where to find the bat ! Process the film. Now in the darkroom, interleave this matte shot with the start of a new unexposed roll. If it's a 100ft roll there will only be room for a few feet more, and some of that has to be leader. Most foreground subjects don't need to be contacted emulsion-to-emulsion because slightly soft edges enhance the effect. So the matte shot is printed normally head-first. In subdued light (or not, as I'll explain next time) manually load the camera with the two thicknesses of film around the sprockets. Important: Allow one frame of extra loop above and below the gate for the added effects element. (In the photo I've just loaded some clear leader to show you.) Interleave the films on the take-up. Run the camera for a second or so to check that all is well.

Now shoot the actors, and your moving foreground will appear magically on the film. Don't forget to remove the short strip of film in the dark prior to processing ! Not all subjects can be treated this way, but many can. Semi-silouhettes can also sometimes work.

Two points:
Because of the extra thickness of film, there is a discrepancy of focus that won't be seen in the reflex viewfinder. In practice I've found it doesn't amount to much, but I think to be on the safe side it's best to increase the depth of focus by using a smaller aperture.
The "clear" film around the matte foreground element will absorb some light, perhaps half a stop.

Monday, November 8, 2010

New Life for 16mm Antiques


16mm film has been around since 1923. Many of those early spool-loading movie cameras are in surprisingly good shape. Are they still OK to use ?

Well, if you see one you fancy the first thing to check is the spring motor. It's likely that everything is siezed up after generations in somebody's attic. If you're handy with such things it may be worth relubricating. More often than not, though, you'll find the motor does run, albeit noisily. Most of these early 16mm cameras had not much film put through them. After all, it was probably more expensive then than it is today. So, usually the cam and claw etc are not very worn.

Another factor to consider is this. All 16mm film these days comes in single-perf. Early cameras were designed to take double-perforated film. It's a shame they stopped double-perf, so useful for doing special effects for instance. You can still find it secondhand.... look for 2R on the label. However, you'll probably need to adapt your 16mm antique to take single-perforated stock.

I've done this with a couple of Kodaks, and it's quite simple. Firstly, remove the gate. Tape over every crack and cranny in the film chamber so that no metal filings can penetrate further. Now carefully file off the sprocket-teeth on the side nearest to you. They are fairly soft. Smooth off with emery. The claw is double too, so you have to remove the nearest outer one with a junior hacksaw. It's hard steel but brittle, and after a few cuts it can be gently broken off with pliers. I found that the picture steadiness was unaffected. Finally, vacuum out all the filings and remove the tape.

Some years ago I bought a 50-footer Kodak and made it into a step printer, see right photo. It's built into a metal box with a separate compartment containing a low-wattage lamp. You can see where I've removed the sprocket teeth and one claw. The film to be printed is held in precise contact with the camera stock, and after passing through the gate it collects in a bin below. Ideal for doing short lengths of film and the images are steady and pin sharp. I have also widened the camera gate to allow the edge markings to print through. With the doors closed it's possible to do the printing in subdued light. That black gaffer tape is simply to help stop stray light while loading the two strips of film.

It may seem a bit crazy to use such antiquated cameras for filming. However, they can be picked up cheaply, and the lenses can produce interesting results. Lens coatings were unheard of in those days. Stephen Spielberg went to the trouble of removing the coatings from his lenses to achieve that special look in 'Saving Private Ryan'. With these 16mm antiques there's no need !

Sunday, October 24, 2010

Little Britain


Well... no Rob. Not exactly. I'm sure the real lady will turn up soon.
--------------------------------------------------------------------

Note: In 'How the West Was Won' wagon train attack, the women were stunt-men !

Thursday, October 21, 2010

No Spitting !


We were filming a short scene meant to be outside an Edwardian pub. The character drinking down the road did a very convincing drunken look, and he also spits down beside him. A man and young lady passes, and the composition and timing all seemed to look pretty good in the Bolex viewfinder, though it would have been nice to have had a video-assist.

Unfortunately, when I viewed the rushes it looks as if the drunk is spitting into the lady's basket ! She was actually some distance from him.

It's the old mistake of objects in the backgound lining up wrongly with the foreground (like trees growing out of folks' heads etc.) Silly me. Would I have noticed it if I'd found the camcorder in time, attaching it to the Bolex ? Probably not, on that small monitor screen.
I supppose this must be one problem you don't get with 3D filming !

So later, alone in the cutting room, what to do ? Well, on these sort of occasions I always try to shoot as many takes as Time and Talent allow. And luckily one of these other takes saved the day. No spitting though.

Moral of this story: Don't ignore the bleeding obvious !

Sunday, October 3, 2010

A Couple in the Bath


Autumn again.... And even bathtime has its problems.
Especially for this couple.

FOOTnote. Why have they only got seven ? Aliens maybe.

Monday, September 13, 2010

Walker Evans


I had an unforgettable experience the other day... an exhibition of 1930s Walker Evans images. Amazingly, they were being shown in an old farmhouse near the Dorset village of Symondsbury. After an hour or so trekking along overgrown bridleways, armed with an Ordnance Survey map, we did manage to find the place. And what a reward... to see the photos that previously I'd only viewed in books was, well, stunning. They were silver prints taken from the original negs (mainly 10 x 8 plates, I believe). It makes me realise how much is lost in any kind of reproduction. You could see fantastic detail in those street scenes. And the farmhouse photos took on another dimension, especially with the harvesting in full swing just a few yards away outside THIS window ! Interestingly, the famous image of the tenant farmer's wife was slightly different from the one you see here. A very faint hint of relaxation. Apparently he took several of her round the back of the farmhouse. On another note, I was intrigued by a copy of a 35mm contact sheet, which he did much later of passengers in a tube train.

The pictures here are from the Life Library of Photography (highly recommended).

Monday, August 9, 2010

Post-flashing Your Image


Let me say straightaway... Post-flashing is just not feasible with Super-8 in cartridges. This is because their design does not permit backwinding more than a few frames at a time. However, most other films can be easily treated... Double Super-8, Single-8, Standard-8, 9.5mm, 16mm, and 35mm in both movie and still versions. 120 roll-film is not really suitable, although 5x4 cut-film is. Nearly all types of emulsion can be flashed, and even the not so contrasty colour-negative could benefit on occasions.

I am sure there are many different ways of flashing. This is the one I use. It may seem a bit hit-and-miss, but it has always worked for me. Here goes !

First I select a nice sunny day. This is perhaps the most difficult part of the exercise, here in Britain. We just need a few minutes of absolutely clear unbroken sunshine. I prefer the sun instead of artificial light, simply because it's not prone to sudden power-cuts or lamp failure which could ruin your precious footage. And dull or cloudy/bright conditions have a habit of changing their exposure alarmingly... our eyes don't always notice it.

OK. The exposed film has been backwound either in a darkroom or the camera (a lens cap might be handy !) With 35mm film the first frame must exactly synchronise for the second pass, otherwise you'll get a dark bar in the picture. So before you start, you must mark the frame in the gate. Still-35mm film has 8 perforations per frame and cine has 3 or 4... lots of possibilities for error here. All other cine-film sizes have only one perf per frame, therefore no danger of mis-framing.

The camera is set up near a window. In the SHADE, I very securely fix a sheet of matt black card. The camera is angled a bit so that no sheen on the card is visible in the viewfinder. Only a small portion is filmed in close-up so it should look evenly lit. The lens is now defocused to infinity giving just a blurred void. Now I take a meter-reading off a GREY card, then open up an extra half-stop to one and a quarter stops according to the dose intended. Now start filming the BLACK card, with one eye on that next cloud approaching !

Using this method with different coloured cards, it's possible to get some interesting tone effects. Sometimes I may do a bit of fading of the flash within the shot if I remembered to note the frame-number reading. (Footage counters are notoriously inaccurate.) And if I'm flashing odd bits of footage, I usually allow a bit more at both ends, perhaps fading the flash in and out, using the iris of the lens.

Sunday, August 8, 2010

The Art of Flashing


I, like many others, use colour-reversal transparency film for still and movie photography. It looks great when projected which is, after all, what it's designed for. But when printed onto another film or indeed digitised, it can look far too contrasty. Bright areas show no detail and eyes disappear into their sockets. How can we deal with this ?

One way is to avoid shooting in bright sunlight. In hazy or cloudy conditions the shadows are far less intense and the film can cope with the reduced contrast. Otherwise try to lighten up people's faces with a reflector or extra lighting. Another solution is to flash the film emulsion.

There are different ways to flash film. Perhaps the ideal way is to do it while shooting, so you'll see the effect in the viewfinder. There are various filters that can help to reduce contrast. More effective is a gadget in front of the lens that flashes some light into the image. I believe Arri used to make one. But it should be possible with some DIY to construct a battery-powered unit that reflects a certain amount of light into the lens via a 50/50 mirror. The colour could be varied with filters to give whatever tone you desire. One or two super-8 movie cameras have a superimposition facility, like the little Elmo 103T you see here. A small mirror reflects a secondary image into the gate. Perhaps use this opening to superimpose some light for flashing.

Like all experimental stuff, it can take a few tries to get the correct exposure, but once you know this, things should work every time. The trick is to just open up enough detail in the dark areas of the image without creating a foggy effect (unless this is your intention). One by-product with Flashing is that it effectively increases the sensitivity of the film. Objects that would be normally invisible in those shadows can appear on the film, so it may also benefit filming for normal projection. It's a bit like using a faster film, except the bright areas don't get affected. Next time we'll look at ways to flash the film AFTER shooting....

Friday, July 16, 2010

My Hokushin


If we are into 16mm each of us has our favourite projectors. For about 20 years now I've been regularly using quite an elderly Hokushin, and it's really proved itself in that period. It describes itself as 'Quartzlight'... must be before they started calling them 'halogen' so perhaps it's 1970 or so ? What I really like about this rugged machine is its simple threading path, so kind to the film. When a mute Kodachrome arrives back from Dwaynes, it goes straight onto the Hokushin. No messing around with sound heads, you just form the loops and away you go. And for cutting copies it's really fast too. I reckon it only takes about 30 seconds to lace up, almost as good as a Steenbeck. The speed sounds nice and constant, and the film never gets scratched. I think not too many of these Hokushin projectors found their way to these shores.

Like many other folks, I picked up my projector cheaply when the schools were ditching 16mm in favour of video. I think it had been dropped... note that crack !

So, rather pleased with my old workhorse, I was surprised the other day to get an email from Alexander Sage in Malaysia. His company Trans-Asian@American Films and Cinema is supplying NEW Hokushin 16mm sound projectors in both halogen and Xenon versions. If you're interested his email is transasi@streamyx.com
They are rather pricey as you'd expect, but it's good to know the Hokushin has made it into the 21st century, and if they are built anything like the 1970s machines they will be around for quite a while yet.

Tuesday, April 6, 2010

Black Drapes

Two thoughts have hit me recently:

(1) I was doing something similar to this last set-up but using a slide projector for the backing. Using more slide projectors as spotlights, I was struck by how much light is reflected back onto the screen. Not from any white walls but from just ordinary objects nearby. So those black drapes came to the rescue. (But of course you might wish to intentionally desaturate the image.)

(2) Looking at the photos of my 16mm copying set-up, I think it's about time I tidied up this room ! Maybe I could just spray all the clutter black ?

Sunday, April 4, 2010

Volcanic Getaway


The volcano is now in full eruption, and as ash and rocks begin to fall, our intrepid hero turns to make his escape. Luckily, we already have footage of a volcano, but now need a shot of hero interacting with it. How to do this with the method described in last month's posts ?

Let's say the film is being made on Super-8 and the volcano footage is on 16mm. It's been taken obviously with quite a long lens, is well-exposed and acceptably steady, though maybe not rock-steady. A 16mm projector is set up with an old super-8 camera connected to it by a flexible shaft. It doesn't matter what speed the camera normally goes at, the projector will run the camera at its own speed, let's say 24 fps. We project onto a decent normal screen say 4 feet wide. This should be possible with fast lenses and film. Certainly 3 feet is no problem for brightness. Scotchlite screens are not necessary for this type of set-up. The camera is positioned some distance to the side. Our hero begins his turn in a position that just misses the projected rays. He is lit by two or three spotlights so that no light falls on the screen. Slide projectors with defocused lenses will work just as well. Some ambient light on the screen doesn't usually matter. Hero starts to run towards camera with polystyrene or papier mache rocks etc falling about him. A medium tele lens setting on the camera enhances the feeling of danger as the volcano appears nearer to the character, as well as matching the perspective. Hand-holding the super-8 camera will add realism, also helping to mask any unsteadiness of the background shot. You could maybe overcrank the camera a bit ? ie. say if the rest of the film is being shot at 18 fps, 24 fps will slow the action somewhat. The main thing that is so important to get right for any effects shot like this, is the colour filtration on the foreground lighting. It must match the background projected plate, or the audience will smell a rat.

Two more points worth mentioning...
When you copy a film there is always some loss of quality, so it makes sense to have the background plate made on higher resolution film-stock than the filming stock. In this example the problem is easily overcome by using 16mm versus the smaller super-8 format.

What about focusing ? Using wide apertures there will be less depth of field, but probably enough to play with. This is one of the unsung virtues of Super-8, so much depth of field... it's a godsend (especially when working with miniatures). However, if you did have a focusing problem you could perhaps do a fast focus-pull from the volcano to the hero.

Monday, March 22, 2010

Bolex projector runs Bolex camera !


And here it is ! This is how I convert 16mm footage to more 16mm stuff in the camera, usually altering it a bit along the way.

That old Bolex S.321 projector has been with me for about 40 years now. At one time I used it for compiling sound tracks. The great thing about this classic machine is that it's very kind to the film and extremely steady. The film can be laced as a silent projector without going round the sound-drum etc. And the motor is strong enough to drive the camera and probably more as well. The Bolex H16 reflex camera is attached to the inching knob-shaft, which as you see is on the side of the Bolex projector, just to be different. The flexible shaft, an old speedo cable, drives the 1:1 shaft on the camera. The cable is supported both ends by sturdy brackets. You're maybe thinking this gadget looks like a set for the latest Wallace and Gromit epic. However, I can assure you it does all actually work !

With the S.321 projector you have the option of a 2 or 3 bladed shutter. I wanted more light so I simply snipped off one of the blades on the '2' shutter. The resulting flicker from a single blade doesn't get recorded. I still use the traditional bulb and condenser lenses, maybe not as bright as a more modern machine but it gives nice and even illumination which is the important thing. There is a variable speed control and I usually opt for something like a stately 14 fps. But the motor takes a short while to get to speed so you have to allow for this when lacing up. Everything is all locked in sync. If something horrible should happen like a film jam (it hasn't yet, touch wood) the drive at the camera is set to give way and fail, and if I'm dozing off that red light will flash. You may feel all this is unnecessary if it all sounds smooth. The screen can be a piece of card, or a decent quality back-projection screen via a front-silvered mirror as you see in this set-up.

Setting up a special-effects shot can be tricky. One way is to run an out-take loop of film prior to connecting the camera, until you're sure the image is as you want it. But I often use this alternative:
I wanted to project just one frame and work on the colour filtration etc in a more leisurely fashion, so I tried various things to achieve a cool gate for long periods. Finally I settled on shining another projector into the S.321's gate via a small mirror. This is planted behind a tiny opening that Bolex have thankfully provided. That Elf projector had seen better days, only the fan runs now, and I even sawed off Elf's front to make more room ! Using the standard f1.2 Elf lens I can get a reasonably bright image if it's kept small. The Bolex lens is the 50mm f1.3 Hi-fi, really crisp. I'd be interested to hear from readers who have tried less cumbersome methods for single-frame projection.
The camera can be put in any position near the projector and is connected when needed. I often make use of the Bolex matte box.

Although stop-frame is marvellous for many effects, running a camera and projector in real time or thereabouts does give some very natural-looking possibilities. It also means there is less time for your effects shot to go wrong !

Monday, March 1, 2010

Copying Movie Film to Film

For quite a few years now, I've been using simple home-made set-ups to copy my films onto other film. Why would anyone want to do this you may ask... Mostly, folks are busy transferring it all to digital.

Making the apparatus in its simplest form takes only a few hours and it's cheap. It means that the original film is copied in 100% sync with no flicker or density fluctuation. But what are the reasons for doing this ?

Firstly, if like me you still enjoy editing on film, it makes good sense to use a cutting copy which can be cut and recut and generally thrown around the place, secure in the knowledge that the original is not being harmed in any way. (Later you carefully cut the original to match.) Using out-of-date film you can easily make economical cutting copies.

Secondly, Special Effects. And there are countless possibilities here. For example, you can add a zoom or other movement to a shot, even make a static scene appear hand-held ! Add distortions, colours, foreground miniatures. Add moving silhouettes, bi-packing another strip of film in the projector. Place a shot into another live action shot so that the composite is seamless. The only effects you can't do are those that require altering the apparent speed, because the copying camera is anchored to the projector.

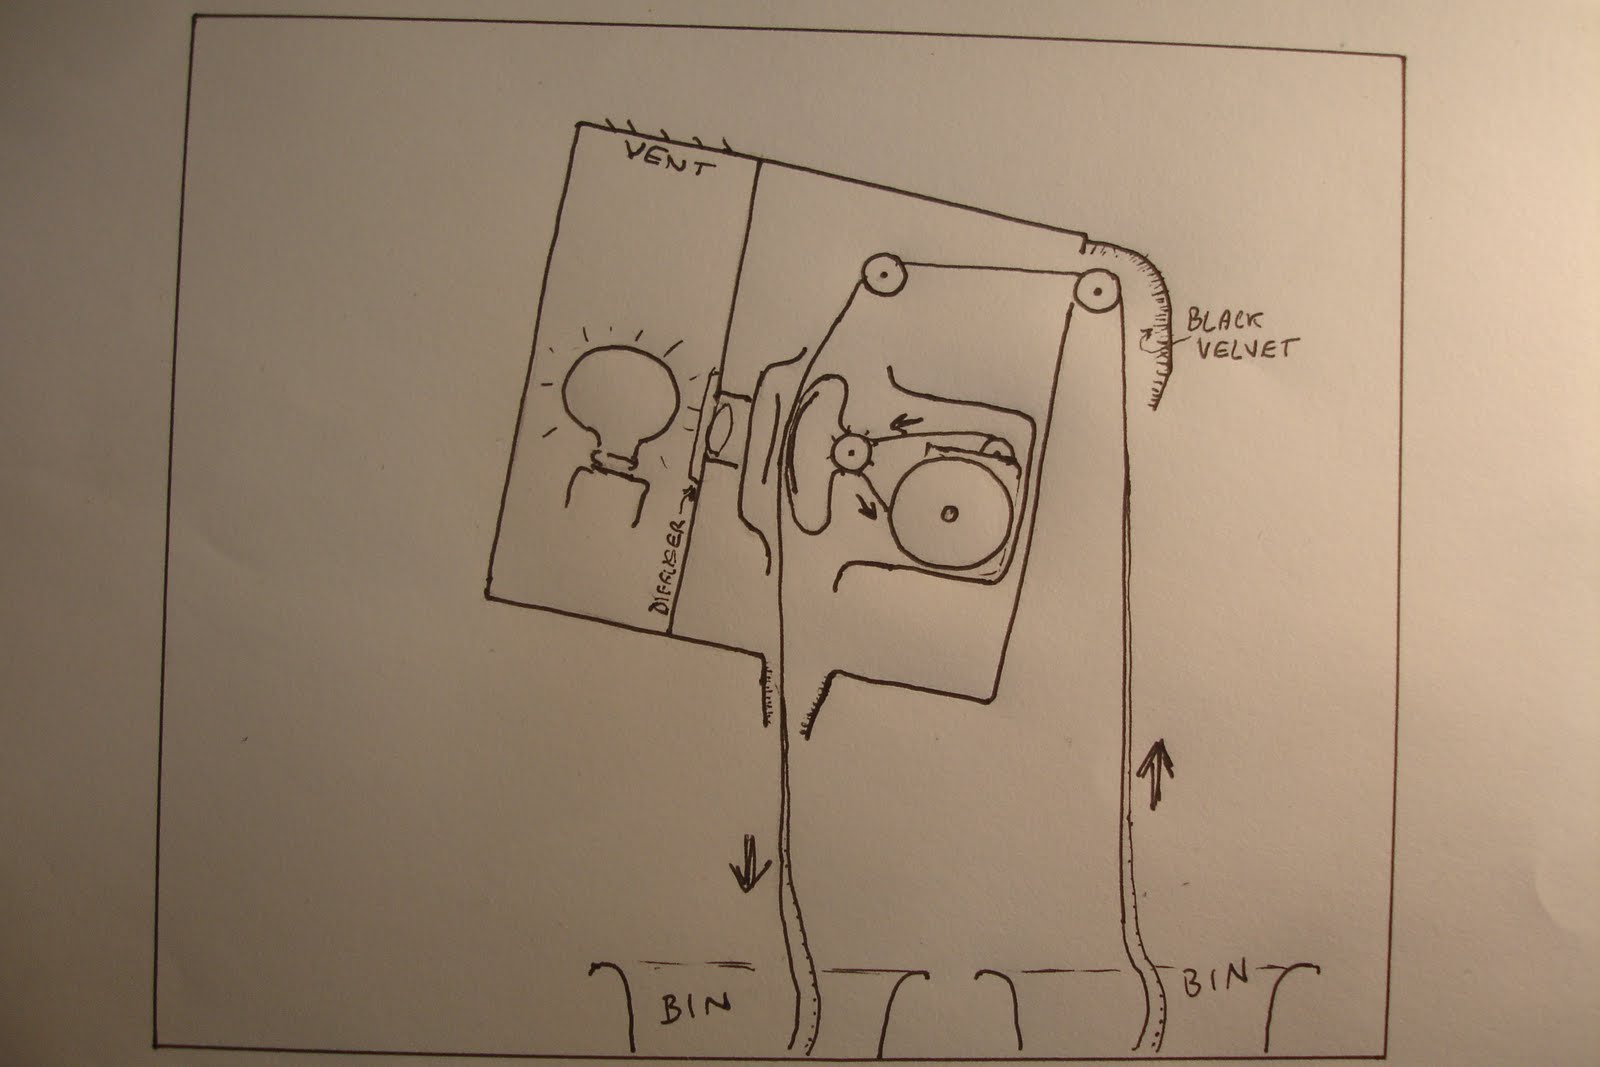
Every movie camera and every projector has its own one-to-one shaft. This system merely involves joining them together, so that they are locked in sync. You can do the job without the join, but there is likely to be sync-loss and other problems. Project onto a small card screen or a good translucent one. It's the same as copying onto video, and for more on this please click on "2008" and see "Telecine Without Tears".

Because all cine apparatus is basically made the same, you can copy ANY gauge of film onto ANY other. So you could copy a 28mm film to 9.5mm if you so wish ! And vice versa I suppose if you could find some 28mm film at Jessops. So film format doesn't matter, all you have to do is find an easy way to join up the 1:1 shafts. What does the 1:1 shaft look like ? If you take the side off a projector (not forgetting to remove the mains lead!) you'll most likely see a rod running its length, carrying the spinning shutter. Sometimes it culminates in an inching knob, and if so this is usually a good point to attach a flexible shaft, perhaps removing the knob first. I've been using old car speedo cables as flexible shafts, and they work well. Some sort of tough collar is needed to lock the shafts together securely with grub screws.

The camera 1:1 shaft is perhaps less easy to reach. Super-8 cameras usually seem to sprout a shaft near the front end. If you're worried about losing those screws and destroying a perfectly good camera trying to find it, why not experiment with a cheapo model ? All you need is a camera that produces reasonable images, perhaps with a close-up lens fitted, and it doesn't even need to have auto exposure. In fact, manual exposure is a must for copying. I'm always testing super-8 cameras, and I reckon that probably one in five of the ones that appear to work have defective auto-exposure... they usually end up in the 'as found' box or worse. But many of these sorry specimens still work on full aperture, so they could be used as copiers. As projector lenses are generally not as good optically as camera lenses, it makes sense to adjust the projector aperture by a stop or so, use the black card washer trick... see that Telecine article again.

So we end up with camera and projector (perhaps running the same film-size, perhaps not) connected by a flexible shaft. Maybe I should say they have to be connected so as to both run film in the same direction! Unless you want reverse effects. Some projector shafts will allow both ends to be utilized. It goes without saying you'll be cutting holes in your projector. The camera is run entirely by the projector-motor, in perfect sync. Turn the projector shaft by hand to check that the shutters are correctly phased, so that they both open simultaneously. One of the collars may need adjusting for this. Projectors normally sport two or three shutters but only one is used to hide the film transport. This is the one that corresponds with the camera-shutter. The others are superfluous for copying film and only absorb light, so could be snipped off if you don't mind a flickery picture (this flicker is not seen by the synchronised camera !) Because the camera is on a flexible shaft it can be set up almost anywhere as long as the shaft doesn't tie itself in knots. The projector can go at any speed and it's often best to keep it fairly slow.

Putting a shot into a new scene is possible by placing a screen or card somewhere within the frame and projecting on that, preferably at a normal speed. Have a go ! Next time I'll maybe show you my 16mm copying set-up.